
Build that blog already
What's holding you back from starting your blog? Sort through the real issues from the noise and start today.
How I migrated my static site from Netlify to Cloudflare including setting up Functions to handle contact form requests

I'm an independent content creator that uses my content partly as a way to to get interest in my paid services. I don't know about you, but for me the idea of an AI LLM scraping my content to regurgitate it without any benefit to me seems like a dumb business decision.
When Cloudflare announced their new service to block AI bots, scrapers, and crawlers, I was intrigued. Many folks are playing whack-a-mole with their robots.txt files, but there's no guarantee a bot will even respect them. As far as running my own server and managing IP block lists:
I ain't got time for that.
For years, I've happily hosted my website on Netlify. However, it currently has no AI bot protection features or services. I'll likely still use it for sites that don't contain expert content, but for this blog, I knew I needed a change.
In this post, I document how I moved my 11ty site from Netlify to Cloudflare, with all its ups and downs. Most of it should be relevant to any static site generator. Jump to a section:
For the most part, Cloudflare's migration docs worked well except for a few hiccups. Make sure you read that doc thoroughly in case your use case is different from mine.
First, I had a few npm scripts that needed updating in my package.json. Namely, I used netlify dev for local development via the npm start command so that I could use secrets stored in Netlify to build locally. I think this may have been for webmentions and/or playing with serverless functions. My webmentions only build in production, so currently I don't need a similar set up. Thus, I switched my start script back to the core 11ty command of npx @11ty/eleventy --serve.
Next, I had several redirects specified in my netlify.toml file. I had to switch to the _redirects file format and had 2 hiccups:
eleventyConfig.addPassthroughCopy("_redirects");/mars-randomizer https://projects.sia.codes/mars-randomizer/
/mars-randomizer/ https://projects.sia.codes/mars-randomizer/Netlify has a beautifully simple forms solution that would clearly not work on Cloudflare. So, I temporarily disabled the form with a note to contact me on social media in the interim. Per the migration instructions, I deleted the data-netlify="true" attribute on my contact <form>.
Once all of that was done, I pointed my name servers to Cloudflare instead and pointed my root domain (and a www redirect) to the new Cloudflare pages deployment. See the various links in Cloudflare's migration post.
Once your site is live, you can turn on AI bot protection. The Cloudflare blog article points us in the right direction. However, the article's dashboard link didn't work for me. It said I did not have permission. Luckily I was able to find it by going to my Dashboard > Websites > sia.codes > Security > Bots.
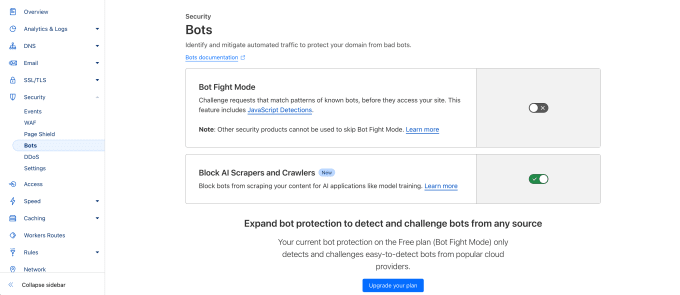
I did not turn on bot fight mode because Nicolas Hoizey mentioned he had issues with feed aggregators not being able to get his feeds (see Mastodon post). I'm currently less worried about regular bots and would rather not mess up folks who follow my RSS feeds. This may change.
I'm a woman in tech on the internet which is one too many potential harassment vectors for my taste. Thus, I choose not to (easily) share my email. Instead, I've opted for contact forms to add a layer of filtering. Netlify's forms feature is ridiculously easy, and I'm sad to lose it.
I had a few options going forward:
I was reluctant change my stance on emails vs forms. And, over the last several years I've only logged in to Netlify to see my form data once or twice and that was more to check the spam filtering. Thus, I figured I really didn't need a table or database. I just want an email. Hence, I went with the second option - emailing myself from a Function.
Before we can dive into the Functions code, we need to set up our local dev environment using Wrangler:
npm install wrangler --save-dev
Add the .wrangler directory to your .gitignore file. That directory stores temporary files and local storage for the cache and various services.
You have to build your 11ty site before starting Wranger. You could do this manually one time with an 11ty build command like npx @11ty/eleventy. Or, if you expect to make changes to core static site code at the same time, build your 11ty site in watch mode with npx @11ty/eleventy --watch. I saved this as my watch script in my package.json. Then, in another terminal window, run npx wrangler pages dev _site. For convenience, I added this as my wrangler script in my package.json.
Open your site at http://localhost:8788/ and verify it works!
Now that Wrangler is set up, we can start building a basic Function. Cloudflare Functions are almost the same as Cloudflare Workers. The main difference is that Functions are scoped within your Pages project. They have some other notable differences - Workers support more features than Functions.
From Get started, create /functions/helloworld.js in the root of your project:
export function onRequest(context) {
  return new Response("Hello, world!")
}
Open your site at http://localhost:8788/. You should see your regular home page there. Now, navigate to http://localhost:8788/helloworld. You should see an unstyled page with only the raw "Hello, world!" text. 🙌
You can delete the helloworld.js file as it was only a test to get Wrangler and Functions running successfully.
This section is mostly a pared-down version of Cloudflare's form tutorial.
In the HTML of your <form>, add (or replace) the action attribute to point to the new function route you are about to create. Note that we're adding an /api folder to the path and that I made my action's name more verbose than the full tutorial:
<form class="form" name="contact" method="POST" id="contact-form" action="/api/submit-contact-form">Next, create the /functions/api/submit-contact-form.js file in the root of your project. Use the same file name you declared in your form's action attribute.
/**
 * POST /api/submit-contact-form
 */
export async function onRequestPost(context) {
  try {
    let input = await context.request.formData();
    let pretty = JSON.stringify([...input], null, 2);
    return new Response(pretty, {
      headers: {
        'Content-Type': 'application/json;charset=utf-8',
      },
    });
  } catch (err) {
    return new Response('Error parsing JSON content', { status: 400 });
  }
}
Run 11ty build/watch and then wrangler. Go to your contact form, and fill it out. When you hit submit, it should redirect to your api route and show you an array of key-value pairs from your form data.
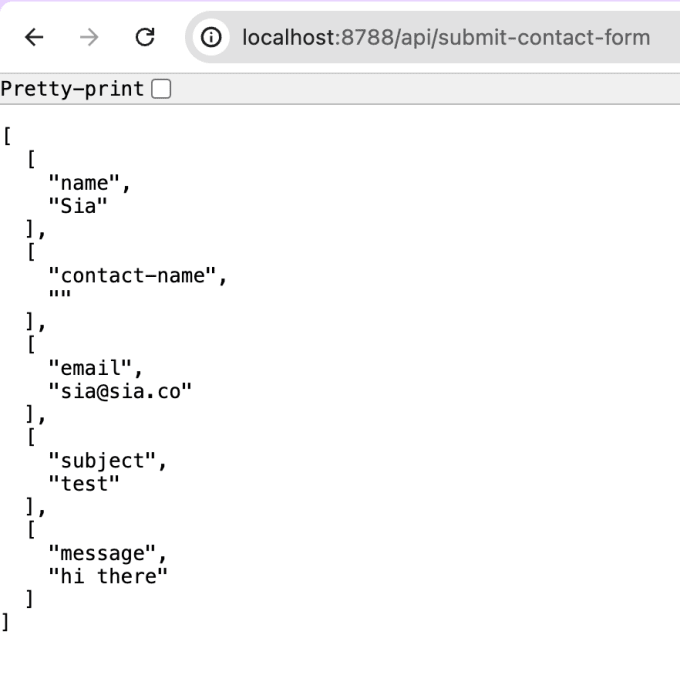
Nice!
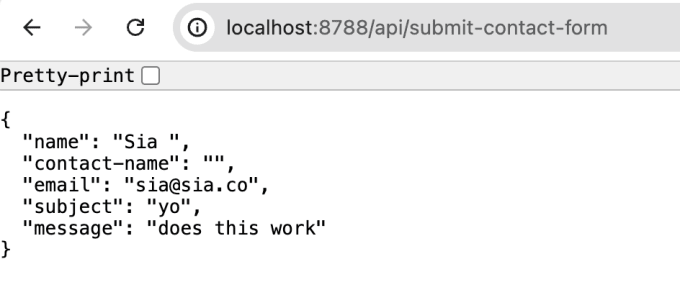
If you want a JSON object instead, continue with the next step by adding a helper for the form data:
/**
 * POST /api/submit-contact-form
 */
export async function onRequestPost(context) {
  try {
    let input = await context.request.formData();

    // Convert FormData to JSON
    // NOTE: Allows multiple values per key
    let output = {};
    for (let [key, value] of input) {
      let tmp = output[key];
      if (tmp === undefined) {
        output[key] = value;
      } else {
        output[key] = [].concat(tmp, value);
      }
    }

    let pretty = JSON.stringify(output, null, 2);

    return new Response(pretty, {
      headers: {
        'Content-Type': 'application/json;charset=utf-8',
      },
    });
  } catch (err) {
    return new Response('Error parsing JSON content', { status: 400 });
  }
}
Now we need to do something with this data.
As I mentioned earlier, I tried and failed to get direct email to work in Functions. Briefly, I attempted setting up a separate Worker to call from the Function, but that was getting silly complicated. Instead, I decided to try a new developer-focused transactional email service called Resend.
I mostly followed the tutorial for sending emails with Resend in Workers but implemented it in Functions instead. It misses a few important steps, so their example repo is useful to reference.
Per the tutorial, create an account, add your domain records, and get an API key.
Your API key should be stored as a secret. I also chose to store my sender and recipient emails as secrets (docs). Note that the sender email needs to be from the domain you set up in Resend.
To use secrets locally, create a .dev.vars file in the root of your project, and add it to your .gitignore file. Set each one as a key-value pair in the file like so:
WEBMENTION_IO_TOKEN="mYsEcrEt"
RESEND_API_KEY="rEsendSecreT"
SENDER_EMAIL="[email protected]"
RECIPIENT_EMAIL="[email protected]"
Next, the docs say you can add secrets to production via the Wrangler CLI like so:
npx wrangler secret put RESEND_API_KEY
That seemed to work, but in production, those env variables were missing. So I used the dashboard method of adding environment variables and selected "encrypt" for each.
Here's my final Function file:
/**
 * POST /api/submit-contact-form
 */
import { Resend } from 'resend';

export async function onRequestPost(context) {
  try {
    let input = await context.request.formData();

    // Convert FormData to JSON
    // NOTE: Allows multiple values per key
    let output = {};
    for (let [key, value] of input) {
      let tmp = output[key];
      if (tmp === undefined) {
        output[key] = value;
      } else {
        output[key] = [].concat(tmp, value);
      }
    }
    // output: {
    //   name: 'Jane Doe',
    //   'contact-name': '',
    //   email: '[email protected]',
    //   subject: 'help me',
    //   message: 'this is my message'

    const honeypot = output["contact-name"]
    // Return early with pretend confirmation if bot hit honeypot
    if (honeypot !== "") {
      return Response.redirect("https://sia.codes/contact-confirmation", 303)
    }

    // Using text instead of email so that I don't need to sanitize it
    const resend = new Resend(context.env.RESEND_API_KEY);
    const { data, error } = await resend.emails.send({
      from: context.env.SENDER_EMAIL,
      reply_to: output.email,
      to: context.env.RECIPIENT_EMAIL,
      subject: `[SIA.CODES] Contact form request from ${output.name}: ${output.subject}`,
      text: output.message,
    });
    console.log({data, error});

    if (error) {
      return Response.redirect("https://sia.codes/404", 303)
    } else {
      return Response.redirect("https://sia.codes/contact-confirmation", 303)
    }

  } catch (err) {
    return Response.redirect("https://sia.codes/404?error=json_parsing", 303)
  }
}
Notice that I modified the function in a few ways:
reply_to attribute to the form's email field to make replying easy for me.text attribute instead of html. This is so that I wouldn't have to sanitize the message field.This worked great in local development. Sadly, in production, I kept getting errors about react-dom. Apparently, React is a dependency of Resend. Even though I did not use React at all, the Resend npm package still calls it. So, sadly, you'll have to install those dependencies to your package.json. It's dumb. I know. The tutorials should show this initial NPM install command instead:
npm i resend react react-dom
Netlify forms also performs spam filtering using Akismet which has a free "personal" tier (and an API). I'm going to wait and see how much spam I get. If you look closely at the code above, I already have a honeypot which filters out a chunk of the bots. If I add spam filtering, I'll write a new post and link to it from here.
All of the steps thus far have been focused on my deployed site. However, I keep my blog source code public to help out other 11ty developers. This means that my blog post content is also public.
Many possibilities exist for hiding the content. I decided with creating a private fork of my repo. The private version is where I will add new posts. The public version is where I will make changes to the core code. Then, I can sync the fork with the upstream main branch.
For now, old posts are still in the public version. I may clean this up later.
As a last step, I cleaned up the following leftover Netlify items:
netlify.toml file..netlify folder..netlify from the .gitignore file.<form> that was only used in Netlify, so I deleted that.Overall, I was very happy with Netlify. If I did not mind letting AI bots scrape my site to hell and back again, I would have stayed.
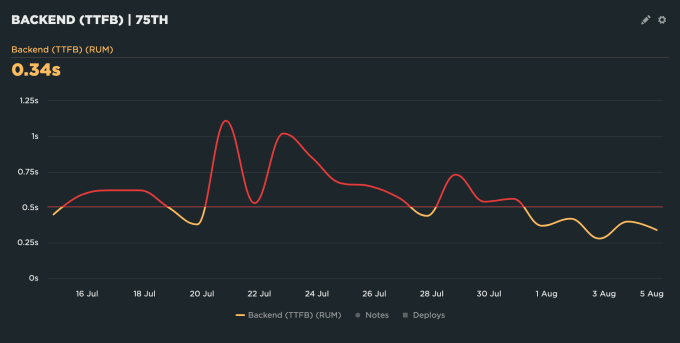
Cloudflare seems more powerful and more performant, but more work to set up. Their edge network seems to have more nodes as well resulting in a faster user experience. My preliminary real user data for TTFB (time to first byte) has dropped slightly - it was already super fast. Either way, as a web performance engineer, this makes me happy. It seems to be translating to start render and LCP (largest contentful paint) as well, but I need more time to gather more data to be sure.
Cover photo by Morgane Perraud on Unsplash
I'm a freelance performance engineer and web developer, and I'm available for your projects.
Hire me
What's holding you back from starting your blog? Sort through the real issues from the noise and start today.

It's really easy.

Extend your content by using ChatGPT to generate blog posts from speaking transcripts
If you liked this article and think others should read it, please share it.
@sia Thanks! I need to look into this as well, at least as a backup solution so this is very handy. source
@hamatti I figured a lot of our crowd would find it useful source
Lol forgot to remove this note. And to create the sketch. Haha will work on it this afternoon source
@sia Oooh let me know how the spam bit goes. I have a honeypot thing but so much spam still comes though into the Netlify forms spambox. I have started piecemeal trying to make a guestbook thing for myself on some shared hosting, not got very far yet, and that will need moderation too... source
@sia Great post! Now I know where to go if I want to migrate from Netlify to Cloudflare. source
@sia @cloudflare I used Akismet to add spam filtering to the guest book I built with Astro, this package was pretty straightforward to implement: https://github.com/cedx/akismet.js GitHub - cedx/akismet.js: Prevent comment spam using Akismet service, in JavaScript. source
@sia @cloudflare Oh, here is the blog post I wrote about! https://ryantrimble.com/blog/creating-a-guestbook-with-astro-db/#spam-filtering Creating a Guestbook with Astro DB | Ryan Trimble, UX/UI developer source
@sarajw yeah it looks like Akismet will work. Just haven't started that step yet source
@mrtrimble @cloudflare that's exactly what I was going to try using. So far I've only gotten 1 spam message so it hasn't been urgent yet source
@mrtrimble @cloudflare thanks! Will definitely be useful when I start source
@sia @cloudflare I've just been worrying about this, and starting to move my projects off of netlify. source
@sia @cloudflare I also faced some challenges getting email sending to work from Cloudflare Pages Functions. I wrote about it: https://codeflood.net/blog/2024/02/15/sending-email-cloudflare-pages-functions/ Sending Email from Cloudflare Pages Functions source
On my to-do list: setting up Cloudflare Functions to handle contact form submissions. @sia.codes has a great article on the topic sia.codes/posts/migrat... source
With search less and less useful by the day, and social media finally fragmenting the web feels frontiersy again source
im kinda surprised Netlify hasn't added this feature yet source
This might interest you @debbieohi.com source
I just watched a newer version of @maggieappleton.com's video from her talk on the expanding dark forest and generative AI. It's a great talk which also prompts deep reflection. Multiple versions here plus the slides: maggieappleton.com/forest-talk source
I might have a better online social experience though because I used to present a lot at conferences. So my strongest online connections are people I met in the meat space. I also find new online friends because they are actively connecting with others I haven’t yet met in the meat space. source
For me, I get a lot out of the open web. I generate content which brings me joy to help people but also helps me get more freelance projects and actual job opportunities through recognition as an “expert”. I also learn a lot by consuming other people’s content which makes me a much better web dev. source
Bluesky gives me hope that we can get closer to the old days. It remains to be seen if the block lists, etc. will help with the increasing amount of junk, but so far so good. I dislike the dramas around cancelling accounts, and I want my friends to feel safe. This reinforces the dark forest theory. source
This is why it was so tragic for me when Elon bought Twitter, and I deleted my account. Mastodon helped but it never scaled. It does have fewer junk accounts so quality is higher. LinkedIn is a dumpster fire of AI content and grift, but I feel forced to be there to help get the benefits I mentioned. source
The timing of your re-posting this is spot on for me. I just got a notice from Netlify that I had reached 50% of my bandwidth on the free plan. They show my bandwidth usage skyrocketing earlier this month. Their data doesn't come close to matching my analytics data. I'm guessing that it's bots. source
The other thing I was wondering is if the bandwidth jump has had anything to do with my changing my Bluesky handle to my personal domain. source
These are webmentions via the IndieWeb and webmention.io. Mention this post from your site: